« Previous
Next »
« Previous
Next »
MICROSOFT EXCEL 2013
MACROS IN MS EXCEL
Macros enable you to automate almost any task that you can undertake in Excel 2013. By using macro recorder from View Tab >> Macro Dropdown to record tasks that you perform routinely, you not only speed up the procedure considerably but you are assured that each step in a task is carried out same way each and every time you perform task. To view macros choose View Tab >> Macro dropdown
MACRO OPTIONS
View tab contains a Macros command button to which a dropdown menu containing the following three options.- View Macros: Opens the Macro dialog box where you can select a macro to run or edit.
- Record Macro: Opens the Record Macro dialog box where you define the settings for your new macro and then start the macro recorder; this is the same as clicking the Record Macro button on the Status bar.
- Use Relative References: Uses relative cell addresses when recording a macro, making the macro more versatile by enabling you to run it in areas of a worksheet other than the ones originally used in the macro’s recording.
- Use MS Excel’s macro recorder to record your actions as you undertake them in a worksheet
- Enter the instructions that you want followed in VBA code in Visual Basic Editor Now lets create a simple macro that will automate the task or making cell content Bold and apply cell color.
- Choose View Tab>> Macro dropdown
- Click on relative reference.
- Click on Record Macro. It will display a dialog box, you can set shortcut key to run macro.
- Click on OK now Macro recording will start.
- Do the steps of action which you want to perform repeatedly. Macro will record those steps.
- You can stop the macro recording once done with all steps.
- Worksheet protection: Protecting a worksheet from being modified, or restricting the modifications to certain users
- Workbook protection: Protecting a workbook from having sheets inserted or deleted, and also requiring the use of password to open the workbook.
- Require a password to open the workbook.
- Prevent users from adding sheets, deleting sheets, hiding sheets, and unhiding sheets.
- Prevent users from changing the size or position or windows.
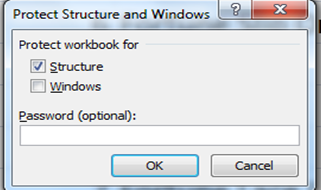
- Choose Review >> (Changes group) Protect Workbook to display the protect Workbook dialog box.
- In the Protect Workbook dialog box, select the Structure check box and Windows check box.
- (Optional) Enter a password.
- Click OK.
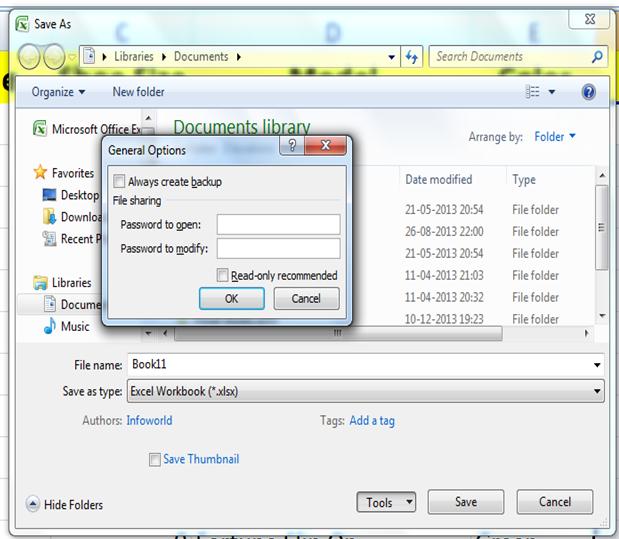
- Choose File>> Click on Save/Save As then select location to open Save As dialog box.
- Click on Tools option >> Select General options.
- Type a new password twice.
- Click Ok to protect document to open.
CREATING MACROS
You can create macros in one of two ways:VIEW MACRO
To Run macro select the object or place the cursor according macro you want to apply macro then click on View Macro and it will display a dialog box, select your macro to be run and click on Run. You can too edit, delete the created Macro. (Editing macro will take you to the VBA programming editor)WORKBOOK SECURITY
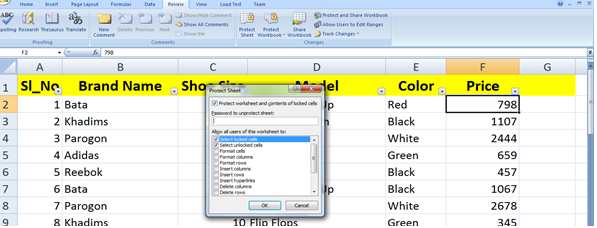
You can apply security to the workbook by the concept of protection available in the Review Tab of ribbon.Protect Worksheet
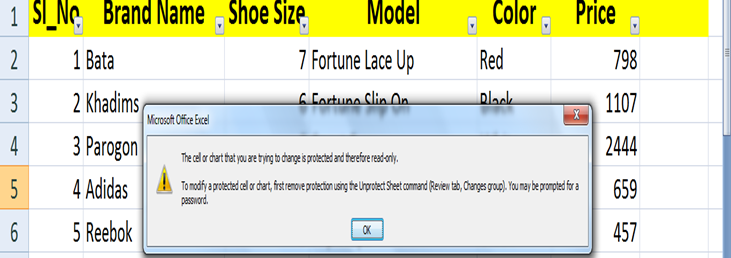
You may want to protect a worksheet for a variety of reasons. One reason is to prevent yourself or others from accidentally deleting formulas or other critical data. A common scenario is to protect a worksheet so that the data can be changed, but the formulas can’t be changed. To protect a worksheet, choose Review >> (Changes group) Protect Sheet. Excel displays the Protect Sheet dialog box. Note that providing a password is optional. If you enter a password, that password will be required to unprotect the worksheet. You can select various options in which the sheet should be protected. Suppose we checked Format Cells option then Excel will not allow to format cells. When somebody tries format the cells he or she will get the error as below.

Protecting a Workbook
Excel provides three ways to protect workbook.
Protecting Workbook’s:
When a workbook’s structure and windows is protected, the user may not Add a sheet, Delete a sheet, Hide a sheet, unhide a sheet, etc and may not allowed to change size or position of workbook’s windows respectively.Password to open a workbook
Excel lets you save a workbook with a password. After doing so, whoever tries to open the workbook must enter the password.