Formatting Text in Word Document
Formatting Text
To formatting your document means you can change your document to more professional and eye catching for this you can find different commands from Home ribbon and font group.
To use these commands first you have to select your text or paragraph which portion you want to change. Here you have number of choices to use commands, i.e. after selection you can use it through Keyboard shortcut, or from font group of home ribbon or from dialog box (you open the dialog box by clicking on dialog box launcher).
Setting Text Font
To Change Font
- Select the text to change.
- Click on the drop-down list arrow to the right of the currently displayed font name.
- Select the font to use-the selected text will alter accordingly or
- Open up the font dialog box or Click on Font Launcher Button.
- Select the list of the available fonts and select one as your choice.
- Click on OK button.
Font Size
- Select the text to change.
- Click on the drop-down list arrow (from font group of Home) to the right of the currently displayed point size. Pick a new number from the list – the selected text will change size accordingly. or
- From Font dialog box select your needed size from size list box and click on OK button. or
- You can use form Font increase and decrease button from home ribbon
Making the Text Bold
- Select the Text you want to Bold
- Click on Bold button in the Font group buttons of Home ribbon. or
- From Font Dialog Box. Select the bold option from Style drop down menu. or
- Press keyboard shortcut Ctrl + B.
Making the Text Italic
- Select the Text you want to Italic
- Click on Italic button in the Font group buttons of Home ribbon. or
- From Font Dialog Box. Select the Italic option from Style drop down menu. or
- Press keyboard shortcut Ctrl + I.
Underlining the Text
- Select the Text you want to Underline
- Click on Underline button in the Font group buttons of Home Ribbon. or
- From Font Dialog Box. Select the Underline option from Style drop down menu. or
- Press keyboard shortcut Ctrl + U.
Remove Bold, Italic and Underline:
- Select the Text
- Click on appropriate option from Bold, Italic or underline button to turn the format off. or
- Press CTRL+ B, CTRL+I or CTRL+U to switch the format off.
To access extra underline styles
- Select text to be underlined
- Click on drop down arrow to right of the U symbol to see more styles scroll until desired style is highlighted.
- Click on a style to apply
To change underline colour
- Select text to be underlined
- Click on drop down arrow to right of the U symbol move to the Underline colour option at the bottom to display colours
- Select colour to apply
To change Font colour
This will change the colour of selected text.
- Select the text you want to change color
- Click the drop-down list arrow displayed on the right-hand side of the button and choose the desired colour.
- Or- Select the desired colour from Font color drop down list of Font Dialog Box.
Text Effect
These options are specially design for changes the appearance of the characters. Some special functions are described below with its characteristics.
Subscript: Create small letter at the base line of character.
Ex: H2O (Hear 2 is subscript character)
Superscript: Create a small letter above the line of text.
Ex: X2 (Hear 2 is the superscript character)
Strikethrough: Draw a line through the middle of the selected text.
Ex: Strikethrough
Hidden: Hidden text on-screen and in the printed document invisible, particularly useful if you want to hide references to the source of a document or picture so they don’t get printed.
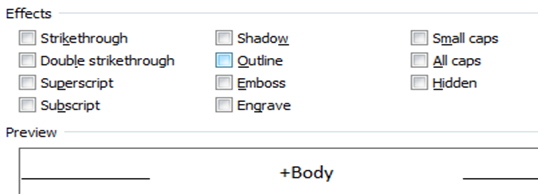
Apply Effect from dialog box
- Select the text to format.
- Access the Font dialog and click the Font tab.
- Check the boxes by clicking in them with the mouse next to the relevant options to switch an effect on. The Preview window will show you what each one looks like.
- Uncheck the boxes to switch an effect off.

CHANGE CASE
Changes the all selected text to UPPER CASE, lower case, Sentence case or other common capitalization features which are describe below.
Sentence case: A sentence case is the case where first character of every sentence is capitalized.
lower case: In this case every word of a sentence is in lowercase.
UPPER CASE: Click on this option to changes the all character to capitalize.
Capitalized Each Word: Switch to this case to capitalize every first character of selected text.
tOGGLEcASE: Click on this option to change the selected words to its reverse way i.e. if any letter in Upper case it convert to lower or if in lower case its convert to Upper.
To apply change case:-
- First select the text (words or sentence).
- Click on change case button dropdown arrow.
- Click on an option as your requirement like Sentence case, lower case upper case etc..
CHARACTER SPACING
This option allow you to increase or decrease the amount of space between individual characters in a word, or raise or lower those characters in relation to the other characters positioned on the same line.
- Select the text to format.
- Access the Font dialog and click the Character spacing tab.
- Click the drop down list next to the default scale settings to list other percentage scales, some bigger and some smaller than the current figure.